Pagina's

dinsdag 27 februari 2018

travel around the world

Hallo allemaal,

Hello everyone,

Voor de blogpost van vandaag ben ik aan de slag gegaan met verschillende stencils van de nieuwe collectie.

For my new blogpost, I used the different stencils from the new collection.


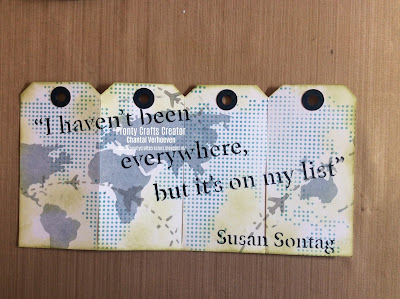
Ik heb 4 tags gebruikt en deze bewerkt met het stencil World Map Graphic (470.803.051) en distress inkt. Dit heb ik met een tool aangebracht

I used 4 tags, the stencil World Map Graphic (470.803.051)  and distress ink for the backgroud


Daarna heb ik met een andere kleur distress inkt de World Map (495.020.003) aangebracht.

With another color distress ink, I add the World Map  (495.020.003) on the tags.


Met grijze distress inkt bracht ik de stencil World Map (470.801.050) aan. 
Zo zie je de kleine vliegtuigjes. Dit is de derde laag.

With grey distress ink, I add the stencil world map  (470.801.050) on the background. 
The little airplaines. This is the thirt layering


Met zwarte memento inkt bracht ik de tekst aan op de tags.

With black memento ink, I add the text on the tags.


De tags verder afgewerkt met een vliegtuig dat ik stempelde, inkleurde en uitknipte en opgeplakt heb.. De randen met groene distress wat kleur gegeven.
Nog een paar kleine details als achtergrond gestempeld.


I stamped an airplane, colored it and cut it out. Arround the tags I've used green distress ink. 
For extra details, I've used little stamps.


Met een zwarte pen, heb ik rond de kaart een lijntje getrokken.

With a black pen, I give detail arround the card.

Ik hoop dat ik jullie me deze nieuwe stencil wat inspiratie heb kunnen geven.

Groetjes


I hope that I have givenyou some inspiration. 

Greetings


Chantal


zondag 18 februari 2018

Colourful jungle

Hallo en welkom,

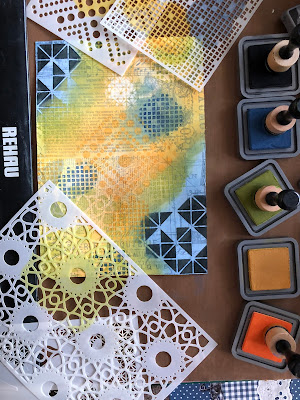
Vandaag laat ik jullie zien hoe je met verschillende stencils, een oude klantenkaart en verf een kleurrijke kaart kunt maken. De stencils zijn uit de nieuwste release van Pronty en binnenkort verkrijgbaar.
-
Hello and welcome

Today I want to show you how you can make a colourful card using stencils, and old savings card and paint. The stencils are from the latest release from Pronty, which will soon be available.


Plaats een paar drupjes verf op je papier (ik gebruikte dik mixed media papier) en veeg deze uit met een pasje. Droog elke kleur voordat je met de volgende kleur begint en laat ook delen wit. Je hebt echt maar heel weinig verf nodig.
-
Put some droplets of paint on your paper (I used heavy mixed media paper) en spread with your savings card. Dry between each colour and leave some white. You only need tiny drops of paint.


Neem een stencil en spons met weinig verf door het stencil. Gebruik een kleur die ook op de achtergrond zit.
-
Choose a stencil and sponge with little paint through the stencil. Use one of the colours on your background.


Herhaal deze stappen met andere stencils en met andere kleuren tot je tevreden bent met het resultaat.
-
Repeat these steps with different stencils and with different colours until you like the result.


Spons een vogel met zwarte en gele verf op een apart stukje papier en knip uit.
-
Sponge a bird with black and yellow paint on a separate piece of paper and cut out.


Voeg nog wat zwarte accenten toe met een stencil en plak het geheel op bijpassend kaartpapier. Plak de vogel en een gestempelde tekst op en klaar is je kleurrijke kaart!
-
Add some black accents around the edges with a stencil and adhere your card to matching card paper. Add the bird and a stamped sentiment and your colourful card is ready!


Met een zwarte verfstift heb ik de poten tot aan het lijfje doorgetrokken. Met een rode verfstift de snavel extra gekleurd.
-
With a black paint marker I connected the legs to the body. With a red paint marker I added some colouring to the beak..

-
Stencils:
470.268.118 Tropical Nature *
470.520.005 Tropical Leafs (set of 4) *
470.803.046 Triptych

* nieuw/ new
-
Ik hoop dat ik je heb kunnen inspireren met deze kaart. Op onze facebook-groep kun je laten zien wat je gemaakt het met de Pronty producten. We zijn erg benieuwd!

Groetjes,
-
I hope I have inspired you with this card. Join our Facebook group to show us your artwork. We look forward to see it!

Kind regards,

vrijdag 16 februari 2018

A paint splattered toolbox

Hallo allemaal,

Hello everyone,

Het Pronty Crafts mdf is een geweldig product. Hiermee kun je iedere keer je eigen draai geven aan wat je maakt. Vandaag heb ik de MDF 3D Toolbox 460.423.730 gemaakt.
-
I just love the Pronty Crafts mdf because you can decorate it to your own liking. Today I made the MDF 3D Toolbox 460.423.730.


Ik heb het mdf voorzien van een laag witte gesso. Vervolgens heb ik het goed laten drogen.
-
I painted the MDF parts with white gesso. After that it has to dry well.


Daarna heb ik de onderdelen eerst in elkaar gezet en ieder compartiment een eigen kleur gegeven.   
-
After that I assembled the different parts and painted each compartment with a different color.


Toen kwam het leukste ! Ik heb met verschillende gereedschappen spatten gemaakt met de  verschillende kleuren verf die ik eerder ook gebruikt had.
-
Then came the fun part ! I used different tools to splatter the box with the different colors of paint I used earlier.   


En dit is het resultaat !
And this is the result !


Ik hoop dat ik jullie weer heb mogen inspireren om ook met de mooie Pronty Crafts spulletjes aan de slag te gaan. Ze zijn een geweldige aanvulling op je hobbykamer!

Hartelijke groet,
-
I hope I've inspired you again to use the beautiful Pronty Crafts products. They’re a great completion to your craft room !

Kind regards,


woensdag 14 februari 2018

Fly

Hallo allemaal,

Hello everyone


Vandaag ben ik met een aantal producten van de nieuwe collectie aan de slag gegaan. Deze producten zullen binnenkort in de winkels verkrijgbaar zijn. Het is een zeer uitgebreide collectie met een paar leuke thema's.

-

Today I've worked with some products from the new collection. These products will soon be available. It's a large collection with a couple of fun thema's.


Als eerste heb ik het Deco Wood vliegtuig in de zwarte gesso gezet aan één kant.

-

First I applied black gesso on one side of the Deco Wood plane.


Met het stencil Travel Tags en grijze acryl verf heb ik de vliegtuigjes op het vliegtuig aangebracht.

-

With the stencil Travel Tags and grey acrylic paint I applied the small planes on the Deco Wood plane.


Met turquoise groene acrylverf heb ik het woord fly van het stencil Tropical Nature er nog bij gezet.

-

I used turquoise green acrylic paint and the stencil Tropical Nature to apply the word fly.


De achterkant van het vliegtuig heb ik in de witte gesso gezet en daarna de hele achterkant en de zijkanten met turquiose groen geverfd.

-

I used white gesso on the back of the plane and painted the back and sides turquoise green.


De tekst heb ik met grijze acrylverf en met behulp van twee stencils aangebracht. Om zo netjes mogelijk te werken heb ik een deel van het stencil afgeplakt.

-

I applied the words with the two stencils. I used Post-Its on the parts I didn't use, so I could work as neatly as possible.


Nog een paar vliegtuigjes er bij en  is de andere kant ook klaar.

-

Just a couple more planes and the other side is also completed.


Het vliegtuig heb ik gemaakt voor een kleine jongen die bijna jarig is en daar hoort dan natuurlijk ook een kaartje bij. 

-

I made the plane for a little boy whose birthday is coming up, so I also made him a birthday card.


Op mijn craftsheet heb ik wat Distress Oxide Ink aangebracht en daar wat water over heen gesprayed.

-

I applied some Distress Oxide Ink on my craftsheet and sprayed some water on it.


Daarna heb ik het papier op de natte inkt gelegd en dan is dit het resultaat.

-

After that I put the paper on the wet ink and this is the result.


Ik vond nog wat te veel wit in de achtergrond zitten en ben met de blending tool er nog even over heen gegaan met dezelfde kleur.

-

I thought the background was a little too white, so I went over it with the same colour ink and the blending tool.


Daarna heb ik met zwarte Distress Ink en het stencil Flight Plan de vliegtuigjes aangebracht. De randen heb ik nog een beetje aangezet met zwart en toen het papier op een turquiose groen kaartje geplakt.

-

After that I used black Distress Ink and the stencil Flight Plan to apply the planes. I put some more black on the edges and glued the paper on a turquoise green card.


Dit zijn de stencils die ik heb gebruikt Travel Tags 470.268.116, Travel Quotes 470.529.009, Flight Plan 470.801.050, Tropical Nature 470.268.118 en dan natuurlijk nog de Deco Wood Airplane 422.000.010.

Ik hoop dat ik jullie al vast een beetje inspiratie heb gegeven voor deze mooie nieuwe collectie, die binnekort weer in de hobby winkels te koop is.


Hartelijke groeten,

-

These are the stencils I've used Travel Tags 470.268.116, Travel Quotes 470.529.009, Flight Plan 470.801.050, Tropical Nature 470.268.118 and I also used the Deco Wood Airplane 422.000.010.

Kind regards, 


zaterdag 10 februari 2018

Travel Journey

Hallo allemaal,
Hello everyone,

wat leuk dat je een kijkje komt nemen op ons blog.
We proberen hier jullie inspiratie te geven, maar zeker ook uitleg over hoe wij creaties opbouwen en wat voor materiaal we gebruiken.

How lovely that you take time to have a look on our blog.
Everytime we try to give you inspiration and explanation about the creations and material we use.

Deze keer laat ik jullie een spread zien uit mijn Art Journal met het Thema Journey.
Hoe leuk kan je dit gebruiken voor op een foto album van een mooie reis die je hebt gemaakt.

This time I show you a spread in my Art Journal with the Theme Journey.
How nice to use on a journey album.


Aan de hand van foto's leg ik uit hoe ik dit gedaan heb.

On basis of the photo's I explain how I did this.

Wat heb je nodig.

What do you need

Een Art journal op een album of papier waar op je wilt gaan werken.
Verf of inkt voor je achtergrond
Pronty stencils:
World Map 470.802.070
Lama & Cactus 470.802.120
Flight Plan 470.801. 050
Topical Leaves 470.850.005
Washi-tape
Wat stempels (ik heb postzegelstempels gekozen)
Tekst Quotes
Acrylmarkers

An Art Journal, album or papier to work on.
Paint or ink for the background.
Pronty stencil:
World Map 470.802.070
Lama & Cactus 470.802.120
Flight Plan 470.801. 050
Topical Leaves 470.850.005
Washi tape
Stamps 
Quotes
 Acrylic Markers


Je begint met het maken van je achtergrond.
Ik heb dat met distress oxide gedaan, maar kan natuurlijk ook met verf of iets anders
In het midden een strook wasi tape geplakt.

Start by creating the background.
I did it with Distress Oxide, but you can also choose for something else.
I stuck washi tape in the middle.


Leg nu je stencil met World Map erop en spons deze met zwarte inkt.
Laat het drogen of gebruik de heattool.

Put your World Map stencil on the background and sponge this with black ink.
Let it dry or use a heattool.


In de linkerhoek heb ik een stencil van de Tropical Leaves gelegd en met een distresstool en distressoxide bewerkt.
Aan de bovenkant een andere uit deze serie gebruikt.

In the left corner I used the stencil Tropical Leaves and with a distress tool I applied Distress Oxide through the openings of the stencil
Above an onther stencil from this serie.


Nu het stencil Flight Plan erop gelegd en ook met zwarte verf en een sponsje gedaan.
Over het zwart heb ik wit gebruikt.

I stencilled trough the openings of the Flight Plan stencil with black paint. On the black images on the background I used white paint.


Rechtsonder heb ik het stencil Llama en Cactus gebruikt met Distress oxide.

On the right side I stencilled Llama and Cactus with Distress Oxide.


Bovenaan weer een ander stencil uit de Tropical Leaves serie.

On the top again an other stencil from the Tropical leaves-line. 


Bij het maken van de woorden op mijn spread heb ik uit voorzorg wat schilderstape geplakt op de randen van het stencil. De woorden zitten heel dicht op de rand en de kans dat je met sponsen ernaast gaat is groot en dan zou zonde zijn van de pagina.
Eventueel kan je het plaatje eronder ook afplakken.
Op de pagina ernaast heb ik hetzelfde gedaan.

As a precaution, I putted tape to the stencil edges, during the stencilling of the words
The words are close on the edges, the chance to go over the edges is great, that would be a shame.
 If you wish you can do the same with the image beneath.
Repeat on the next page.


Nu heb ik wat stempels gezet en met verschillende kleuren acrylmarkers omtrekken van de stencils bewerkt.

Thereafter I did some stamping and outlining from the stencils with Acrylic Markers. 


Ook de quotes geplakt en wat gedoodled op de woorden.
Langs de tekst heb ik met een zwart potlood randjes gemaakt en die met een vochtige penseel wat uitgevaagd.

I sticked the quotes on the pages.
I drew some black lines along the quotes and  wiped the lines out with a waterbrush.


En dit is dan het resultaat. Bewerk de randen van je pagina nog wat met distressinkt om het helemaal af te maken.

This is the result. Colour your edges of the pages with distress ink to finish.


Dit was mijn bijdrage voor nu,
graag tot een volgende keer.

This was my contribution for today,
hope to see you next time.


dinsdag 6 februari 2018

One is Four

Lieve lezers
Dear readers


Vandaag vier kaarten voor jullie gemaakt uit één A4 vel. vandaar de titel "One is Four"
Today four cards for you made from one A4 sheet. hence the title "One is Four"


Hieronder laat ik jullie zien hoe ik deze kaarten heb gemaakt.
Below I show you how I made these cards.

Een A4 vel aquarelpapier bewerkt met Gesso en laten drogen.
Daarna tissues paper opgeplakt en laten drogen.
An  A4 sheet of watercolor paper edited with Gesso and allowed to dry.
Then apply tissue paper and let it dry


Vervolgens weer bewerkt met een laagje gesso verdund met water omdat ik de achtergrond wilde blijven zien.
Then again processed with a layer of gesso diluted with water because I wanted to continue to see the background.


De achtergrond heb ik op kleur gebracht met distress oxide
I changed the background by coloring it with distress oxide


En daarna aan de slag met de mooie stencils van Pronty
De volgende stencils heb ik gebruikt hiervoor
And then I get started with the beautiful stencils of Pronty
I used the following stencils for this project

Pattern triangles 470.803.043
Dots pattern 470.802.062
Squares 470.801.046
Spirograph 470.803.049
Spirograph 470.803.048


Nog met wat stempeltjes bewerkt 
Still worked with some stamps


 Om de achtergrond nog wat te vervagen heb ik met een witte inkt gesprayed
To blur the background a bit, I sprayed with a white ink


Wat accenten aangebracht met fine lijners
Some accents applied with fine lijners


En het vel in vieren gesneden
And cut the sheet in four


Wat leuke stempel erbij gezocht en ingekleurd met distress inkt
Found some nice stamps  and colored it with distress ink


De kaarten gemat op zwart cardstock 
The cards measured on black cardstock


En zie hieronder het resultaat
And see the result below


Ik hoop dat ik jullie weer wat inspiratie heb gegeven.
I hope I have given you some inspiration again.


Groetjes en tot de volgende post
Greetings and until the next post